Pages

Showing posts with label recipes. Show all posts

Tuesday, January 26, 2010

Vintage Rose Kitchen: Red Pepper Pate

For Ruby Tuesday I've decided to do a recipe which zings with the vibrancy of red!
 It's dead easy to make, keeps for three weeks and is delicious at any time with toast, crackers, cheeses etc.etc.etc. So let's get to it:
Ingredients:
4 large red peppers
3 garlic cloves (optional as is the quantity)
150g butter, melted (or approx 100g cream cheese)
10mls freshly chopped oregano & basil leaves
1 tbl Balsamic vinegar (or to taste)
Pinch salt
Dash Peri peri/ chilli sauce


Method:
Preheat oven to 240degrees
Line a medium oven tray with tinfoil
Cut peppers in half lengthways and remove seeds.
Arrange peppers and garlic cloves on tray and bake for 20 minutes
Cool and remove skins
Place peppers, garlic, vinegar and peri peri sauce etc. in a food processor and blend until smooth
With processor on slow, slowly pour in butter in a thin stream (or fold in cream cheese) until mixture is smooth and creamy
Stir in oregano/ basil mix
Place in an airtight container and refrigerate.   Keeps for up to three weeks
Serve with a variety of crackers or breads and cheeses or cold meats

Image:  All rights reserved - copyright 2010 Gena D Images
for Vintage Rose Studio

Tuesday, January 12, 2010

Vintage Rose Kitchen: Strawberry Muffins


strawberry muffins served with ice cream and fresh strawberries

a great variation on the usual muffin with raisins and such fruit - using fresh fruit really does make a difference, and I find it's a perfect muffin to use as a dessert, as above. 

Ingredients:
1 1/2 cup cake flour

½ cup digestive bran (optional)
1 tsp salt
1 tsp cinnamon
1 tsp vanilla
1 cup sugar
2 cups sliced or quartered strawberries
2 eggs, beaten
½ cup cooking oil
Approx 125mls water (determine consistency - add more if digestive bran added)


The How to :


Preheat oven to 180degrees (or 350F)
Beat eggs, sugar and oil together
Add remaining dry ingredients and mix well
Add strawberries and fold into the mixture
Bake in muffin pans for approx 25 minutes
Allow to cool and serve with butter, cream or for a great dessert with fresh strawberries and ice cream!


Enjoy!!


Tuesday, November 24, 2009

Vintage Rose Kitchen: Zucchini Cake (bread/ loaf or even muffins)


zucchini loaf and muffins

A while back I saw a recipe for a Zucchini (baby marrow or courgette) loaf and was fascinated - after all we do not normally relate vegetables (with exception of the carrot) to cakes, sweet loaves or muffins.    Well I tried it and loved it. 


I've since modified the recipe slightly (as I always do) making it less sweet and adding more zucchini and other ingredients.   We have now tried it in various forms from the loaf, to muffins to a gorgeous cake  (see pics below) which I made for a gathering yesterday ..... it's simply wonderful and reminiscent of the wondorous carrot cake...

.
a slice of zucchini cake ....

Ingedients:
3 eggs
1 cup cooking oil
1 1/2 cups sugar
2 1/2 cups grated zucchini
1 tsp vanilla essence
1 cups walnuts/ pecans (optional)
3 cups self raising flour
1 tsp salt
3 tsps cinnamon
zest of a lemon

Okay and how to make it up ....
1.  Beat eggs, oil and sugar together until well creamed
2. Stir in zucchini
3. Add flour, salt, and cinnamon
4. Finally stir in nuts and lemon zest.  Do not over mix.
5. Pour batter into a substantial loaf or cake tin until 3/4 full
6. Bake at 160 degrees (325 F) for approx 60 minutes
7. If you are making muffins, bake for approx 30 minutes
NB. this amount of batter make a very large loaf or cake!


after pouring the "wicked' cream and yoghurt "icing" - yummy .....

We decided to "ice" (frost) the cake and here is the recipe:
150mls cream, whipped
4 heaped tbls icing sugar
3 tbls plain yoghurt
zest of a lemon
Mix all ingredients well and refrigerate.

When cake is cold, pour generously over the cake, allowing the icing to pour down the sides.
Note:   You will need to refrigerate any leftover cake, due to the dairy in the "icing".

 Picture Credits :  Gena D Images

Wednesday, November 4, 2009

Vintage Rose Kitchen: Savoury French Tarts


On the back of my recent post in which I mentioned my enjoyment of Laura Calder's "French Food At Home" series, herewith the link to a list of quick and easy Savoury Tarts, all of which looked very simple to make. I particularly liked the look of the Savoury Tomato Tart, (although the others certain appealed just as much) and am proud to announce that I tried it - it was quick, simple, easy and very tasty - my chaps devoured it before I got a second chance. This is definitely a great starter for a dinner party..

For the Tomato Tart(e) recipe, click here... it'll take you stright through...

and click here to main page of Savoury Tarts : http://www.foodtv.ca/ontv/titledetails.aspx?titleid=102522

Enjoy!!

Friday, October 30, 2009

Vintage Rose Kitchen: Healthy Bran Muffins


Okay, so I love interesting foods, and if they are "healthy" AND simple, count me in! I've used this Bran Muffin recipe for probably well over 10 years. I did a google search recently and noticed that the "original" bran muffin recipe has been around for a while. As always I tend to adapt a recipe to my own likes and/ or needs, things like, less sugar AND more flavour.... so here is my version of the recipe:

Ingredients:
2 eggs
1 and 1/3 cup of brown sugar
1/2 cup cooking oil
2 cups digestive bran
2 cups milk (soya, or other or half water)
1 tsp salt
2 1/2 cups Nutty wheat flour (altho you can use normal cake flour)
2 1/2 tsp bicarbonate of soda
1 tsp vanilla essence
1/3 cup raisins (or less to taste, or optional)*

How to make the muffins:
1. In a large mixing bowl, beat the eggs, oil and brown sugar until well creamed.
2. Add digestive bran, milk (or substitute fluid), bicarb, salt, vanilla essence and flour. Mix well.
3. Add raisins, mix and fill muffin pans 2/3 full.
4. Bake for approx 25 minutes in oven set to 160 degrees. (325F)
5. Cool and enjoy!
This makes approx 24- 30 bran muffins and they freeze very well. I tend to make a huge batch and freeze them for when required.

Ringing the changes*:
Add 1/2 cup chopped dates
Add 1/2 cup chopped pecan nuts
Add 1/3 cup sunflower, pumpkin, sesame seeds
Add 1/2 cup cranberries
Add 1 cup fresh strawberries, gooseberries, blueberries
Add 1 cup grated carrot
Add 1 cup grated apple

These are some of the things I've added / tried before, and all with great success. I tend to add whatever we have at home, so at times the Bran muffins will have raisins, nuts, grated carrots and seeds. The options are endless and this is truly a flop proof recipe!

Have fun and a great weekend! G

Thursday, October 22, 2009

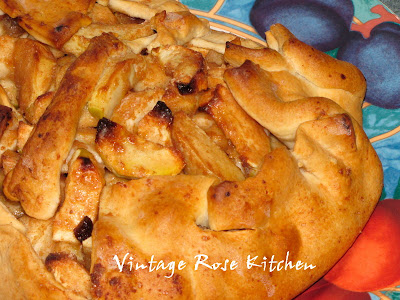
Vintage Rose Kitchen: Rustic Apple Tart

Rustic Apple Tart slice with ice cream
A little while back I posted a link and information regarding French Food at Home and in particular referring to Sweet French Tarts. I love the simplicity of the programme and the recipes in general are well worth a try (at least once, is what I say).

Well, I'm proud to announce that I tried the Rustic Apple Tart (or Rough Apple Galette, as Laura calls it) and was pleasantly surprised at how quick and easy it was to make. And very tasty to boot! I will definitely make it again as it seems the family really enjoyed it too!

Rustic Apple Tart

My comments :

  • The perfectionist in me was quite "perturbed" by the "rustic" appearance - which is the point after all - but I kept thinking it should look neater - LOL!

  • I found I needed to cook it a little longer than the recipe suggested.
  • I will partially precook the apples, as some were still a little "chewy" after baking.

All in all though, a worthwhile exercise in french tart making. Give it a go, you'll be pleasantly surprised and you'll have learnt something new too!!

PS. 28.10.09: Forgot to add that due to time constraints I used ready made pastry.

Link to the Apple Tart recipe on French Food at Home, click here.

Link to previous post on Sweet French Tarts

Monday, October 19, 2009

Vintage Rose Kitchen: Strawberry jam anyone?

A continental breakfast tray ... yummy!!
There's an abundance of strawberries around at present, so I thought it best to take advantage of this fact and get down to making some fruity strawberry jam. It always amazes me how simple and relatively quick, making jam is. The biggest demand is the prep (which really isn't much) and the occasional stirring to make sure the jam doesn't stick or burn...

So here's the recipe I used :

1kg strawberries (cleaned and halved or quartered, altho I like to leave some the smaller ones whole, as it makes a fruitier jam)
900g sugar
200mls fresh lemon juice
80mls water

Makes 4-5 jam jars

1. Put all ingredients in a large pot, and over low heat allow the sugar to dissolve and form a syrup (keep an eye on this so as not to burn).
2. Once the sugar is liquid, turn the heat up and bring to a "boil".
3. Once boiling turn heat down to keep the mixture simmering for at least 20 minutes (which is what the recipe recommends, altho I prefer to boil the mixture for another 10-20minutes - it just makes the jam slightly thicker).
4. Sterilise your jam jars, and bottle whilst hot (CAUTION that you don't burn yourself).
Label and enjoy!!!

My next venture in jam making is going to be Apricot jam. As apricot season is very short and I missed it last year, I have made a reminder on our kitchen blackboard, ..... so, watch this space!!!

My reminder on the kitchen blackboard!

Gena

Friday, October 9, 2009

Sweet French Tarts


I was watching a re-run of Laura Calder's French Food at Home (series 1) and particularly enjoyed the episodes in which she tackles Savoury and Sweet French Tarts, respectively. My interest could probably be ascribed to the fact that I've always had a "fear" or maybe more of a, resistance, to working with pastry, but have more recently ventured to try a few things and realised it actually isn't that much of a saga. Of course, let's not forget the fact that Laura makes everything look and feel soooo easy, I guess also helps .... anyway here is the link to her sweet tart recipes .... Enjoy, I'm hoping to tackle the Rustic Apple Galette.

Click on Link, which takes you to the page that lists the Sweet Tarts : http://www.foodtv.ca/ontv/titledetails.aspx?titleid=102519

Picture Credit: French Food at Home

Wednesday, September 9, 2009

A light Pasta salad

I love cooking, especially when it's to share with a number of people. As the warmer heats up, I tend to favour light, simple, quick and easy dishes. So here's the first (of many to come, I guess) of the summer feast. This is a very simple pata "salad" which feeds four.
1 packet fusilli (spirals) pasta, cooked al dente
1 large tin of tuna (425g) or equivalent, in brine to reduce fat content
1 large onion, sliced/ diced
2 tbls olive oil
2-3 spring onions, finely chopped
a handful of fresh parsely, finely chopped
chives
2 tablespoons lite mayonnaise
a squeeze of lemon juice
paprika
salt, pepper
chilli (optional) to taste

Steps :
1. Cook pasta.
2. Fry onion (in olive oil) until golden (not burnt!) add salt to avoid burning
3. Add tuna to warm through, then add shopped spring onion.
4. Remove fro mthe heat, add chives and parsley
5. Place mayonnaise in a bowl, add some salt, pper and a tiny bit of paprika for colour - mix well.
6. Combine pasta, and tuna mixture i na large bowl, add sauce, a squeeze of lemon juice and mix well. If you feel you want more mayo, or more olive oil, chilli, salt or pepper, season to taste
7. Can be served warm or cold with a side salad, olives, crusty bread and a glass of crisp dry white wine!

Picture credit: Gena D Photography

Friday, July 24, 2009

A Provencal Patio


Hmm, it's weekend and perfect timing to sit out on the patio, much like this, sipping coffee; tea; fruit juice or whatever else takes your fancy. Perhaps enjoying a slice of the delicious Pineapple Cake (recipe below) with lashings of cream and fresh berries..... oh! yes and enjoying a really good read.... or perhaps some really stimulating conversation!
Whatever you do this weekend, have fun!!!

Picture Credit : Scanned from old issue of Vogue Living Australia

Thursday, July 23, 2009

Delicious Pineapple Cake


This "pineapple cake recipe" has been around our home for a good many years. It's been served as dessert after a number of lunches or dinners, it's served as a birthday cake, a party cake, a celebration cake ... you name it, it's been there. I've chosen to publish it, really because it's so versatile and quick and easy to make, and it's good served hot or cold, in summer or in winter - enough qualities to warrant it being "published".

Ingredients:
2 Eggs
3/4 cup sugar
1 cup self raising flour
2 tablespoons oil
1/4 cup milk (or soya milk)
1 teaspoon baking powder
1/2 tsp salt
1 x 440g tin pineapple pieces, drained

1. Mix eggs, oil and sugar together and cream well.
2. Add flour, milk, baking powder and salt. Mix well, but don't overbeat.
3. Drain pineapple pieces and add to cake mixture. (reserve juice if you'd like to add to the sauce or in place of the cream)
4. Mix and pour into a greased flat glass (ovenproof) dish (it must be suitable to serve from) - should fill no more that 2/3 to allow for expansion.
5. Bake at 180 C for approx 30 minutes (or until skewer comes out clean).

Sauce:
1/2 cup cream
1/2 sup sugar
pinch salt

1. As the cake nears the end of baking, prepare the sauce, as it is best poured over the hot cake to enable the sauce to soak into it.
2. Place all ingredients in a pot and bring to the boil. Remove from heat immediately i.e. do not overboil.
3. Pour sauce over the cake as soon as it's removed from oven - no need to cool.


Alternatively: You can use the pineapple syrup and 3 tbl butter and 1/4 cup sugar for the sauce OR just simply pour the warmed pineapple juice/ syrup over the cake.

Cut into squares and serve hot or cold with custard, ice-cream, cream, fruit salad .....

Quantity: approx 6-8 servings (more if being served with fruit salad and/or ice cream).

Ring the changes with :
  • 1/3 cup of dessicated coconut added to pineapple cake mixture.
  • (canned) apple pie pieces or canned pear halves (in this instance I lay the fruit on the bottom of a greased glass dish and pour the batter over it. Bake and sauce in the same way as above).
  • add 1/3 cup raisins to batter when making the apple or pear version

    Note: amendments made 29.10.09

Tuesday, July 7, 2009

Chocolate Chip Cookies

A few weeks ago the Choc chip cookie urban legend was doing it's rounds (see my write up about it on Thinking Aloud. It appears that this recipe (or a version of it anyway) has been around for a long time and was last touted as the Nieman Marcus Choc Chip Cookie. In South Africa it has been "rebranded" as the Woolworths cookie. Be that as it may, I understand that this recipe makes outstanding chocolate chip cookies, I'm calling it :

The Chocolatiest Choc Chip Cookie Recipe

1 cup (250mls) softened - not melted - butter
340g chocolate chips
2 cups (500mls) cake flour
1 cup (250mls) brown sugar
1 tsp (5ml) bicarbonate of soda
1/2 tsp salt
1 (250mls) cup white sugar
250g grated chocolate
2 1/2 cups blended oatmeal
2 eggs
1 tsp (5mls) baking powder
1 tsp (5mls) vanilla
1 1/2 cups (375mls) chopped nuts (optional)

1. Measure oatmeal, and blend until fine.
2. Cream the butter and both sugars.
3. Add eggs and vanilla, mix together with flour, oatmeal, salt, baking powder and bicarbonate of soda.
4. Add chocolate chips, grated chocolate and nuts. Mix together well.
5. Roll mixture into balls and place 5cms apart on a baking tray. Quantity makes approx 56 choc chip cookies,
6. Bake for 10mins at 180C. Cool and Enjoy!

Let me know your thoughts on this recipe.

Picture from Chocolate rewards

Wednesday, June 24, 2009

Butternut and Corn Soup ... from the Vintage Rose KItchen

Another soup from the Vintage Rose Kitchen. A smooth, rich soup to enjoy with a dollop of cream, rye or sour dough breads and a variety of cheeses.

Ingredients:
1 kg butternut, chopped
1.750mls stock
1 large onion, chopped
5 stalks celery, chopped
3 carrots cubed
1-2 medium potato, cubed
2 tsps cumin
1 tsp dried thyme (or fresh equivalent)
1 tsp dried parsley (or fresh equivalent)
4 tbls olive oil
1 tin creamed sweetcorn

1. In a pot, brown onion in 2tbls olive oil (do not burn)
2. Add stock, butternut, celery, carrots, potato, herbs and spices.
3. Boil for approximately 1 hr, until vegetables are very soft.
4. With a stick blender, puree all ingredients.
5. Add creamed sweetcorn, remainder of olive oil, salt and pepper to taste, stir well and bring to the boil and remove from heat.
6. Serve with a dollop of cream, rye or sour dough bread and a variety of strong flavoured cheeses.

I find this soup tastes much better made many hours beforehand or enjoyed the next day... somehow the flavors seem to "mature".

Have fun and let me know your thoughts!

Monday, June 8, 2009

Roast Tomato & Pumpkin Soup


In this version I roasted the tomatoes only. Some like to roast the pumpkin too. I suggest if you do, then roast each item separately to speed things up. Makes approx 6 servings

Ingredients:
Approx 1 kg tomatoes (red but not overripe) cut into quarters or thick slices
Approx 1 kg pumpkin, chopped
1 large red pepper (sliced in chunks) optional
1-2 cloves garlic (optional)
1 large onion or 1 med onion and 2-3 leeks finely sliced
1.5 litres water
3 stock cubes
4 tbls olive oil
3 tsps paprika
1/2 tsp dried thyme (or fresh equivalent, finely chopped)
1/2 tsp dried oregano (or fresh equivalent, finely chopped)
2 tsps dried basil (or fresh equivalent, freshly chopped)
Salt and pepper to taste

1.Place tomatoes in an oven pan with a little amount of water to avoid drying or burning too quickly. Roast until edges start browning (do not burn).
If using red pepper place in an oven tray and roast until browned.
2. Meanwhile in a pot place onions (and leeks and garlic if used) with 2 tbls olive oil. Add salt to avoid burning too quickly. Cook until just lightly browned.
3. Dissolve stock cubes in water and add to pot. If not roasting pumpkin, add to the stock and cook until soft. (while tomatoes roast).
4. When tomatoes ready (and pepper, if used) add to the pot. Add remainder of herbs and spices and simmer gently for approx 1 hour.
5. Remove from the heat, cool slightly and with a stick blender, puree all ingredients well.
6. Add last tbls olive oil, salt and pepper to taste and return to stove for a quick boil. If soup too thick for your liking, add about 125ml water and boil, or if you enjoy cream or milk in your soup, add 125mls to the pot, stirring well.
7. Serve piping hot with a dollop of cream if desired and chopped fresh basil and parsley, a crunchy seed loaf and a platter of various cheeses.
Bon appetit!!

Friday, June 5, 2009

Cold weather and comfort food

Taking Leslie Newman's words to heart (see Thinking Aloud Blog) i.e. with the cooler weather the creative juices flow regarding interesting foodstuff.... I experimented with a new recipe yesterday. Roast Tomato and Pumpkin soup .... delicious!! Just need to refine the ingredients and watch this space .... recipe coming up!
G

Tuesday, May 26, 2009

Anyone for Morroccan Chicken Soup?


Whilst "playing" around with flavours in a dish this weekend, I suddenly felt inspired to make a spicy Morroccan Chicken soup. Off to the store to pick a few fresh supplies and back home to chop, chop, chop and put this concoction together in a pot to "stew". Since all the vegetables are very finely chopped and chicken cooks through quickly, in just over an hour we had a large pot of delicious soup, ready to enjoy!! So if you would like to try it, here's the recipe ....


RECIPE
Makes approx 2 litres soup (enough for 8 servings)
2 lt water
3-4 stock cubes (chicken or vegetable)
4 large chicken breasts (cubed)
1 large sweetpotato - peeled and cut in small cubes
2 medium carrots - peeled and cut in small cubes
2 celery sticks - sliced
1 medium onion - chopped
2 leeks chopped
1 tin whole Italian tomatoes (cut into chunks)
1,5 cups cooked chickpeas
1/2 cup red lentils
2 tsps (level) cumin
1 tsp level coriander
1 tsp ground ginger
1 tbl coriander leaves chopped or 1tsp dried coriander leaves
3 tsps paprika
1 clove garlic (or equivalent quantity crushed) Optional
1 small tin tomato paste (optional)
salt and pepper to taste
3-4 tablespoons olive oil

1. Gently fry onion and leeks in 2tbls olive oil until golden (a sprinkling of salt ensures that they don't dry out and burn too quickly)
2. Add chicken and stir fry until sealed.
3. Add 1,5 litre water, chicken stock, red lentils, sweetpotato, carrots, celery and boil for 30 minutes.
4. Add remaining 1/5 litre water, add spices, and herbs, tomato and tomato paste, olive oil and simmer for another 30-45minutes.

Serve piping hot with crusty bread!
BON APPETIT!

Sunday, May 24, 2009

Busy Times...and making jam????

I managed to get Vintage Rose up and running and have not stopped running myself since then, so have not had much time to blog on Vintage Rose ... such is life!!

During late March and April (which is really harvest time in the Southern hemisphere), I took to trying out all sorts of jams and preserve making. I'd always felt that jam making was filled with mystery - that this was something that only your grandmother or maybe mother could accomplish. I needed to bust this myth or at least know that I tried.

And what a wonderful experience it turned out to be!! Jam making is dead easy - it's really all about the best quality fruit you can get, weight of fruit vs. sugar vs. water, boil until thick and bottle - voila - that simple!!!!!!!!!

Well okay, some are simpler than others' to make and yes, I did learn a few don'ts and a few worth trying, DO's. I even tried making apricot jam out of dried apricots - just a easy- and it makes a delicious fruity jam!

Anyone for scones and tea?

Blog Widget by LinkWithin